| 일 | 월 | 화 | 수 | 목 | 금 | 토 |
|---|---|---|---|---|---|---|
| 1 | ||||||
| 2 | 3 | 4 | 5 | 6 | 7 | 8 |
| 9 | 10 | 11 | 12 | 13 | 14 | 15 |
| 16 | 17 | 18 | 19 | 20 | 21 | 22 |
| 23 | 24 | 25 | 26 | 27 | 28 | 29 |
| 30 |
- dataflow modeling
- pwm
- half adder
- behavioral modeling
- DHT11
- Algorithm
- FND
- uart 통신
- i2c 통신
- LED
- atmega 128a
- gpio
- stop watch
- java
- ATMEGA128A
- test bench
- hc-sr04
- vivado
- BASYS3
- Linked List
- D Flip Flop
- prescaling
- ring counter
- KEYPAD
- Recursion
- verilog
- Pspice
- structural modeling
- Edge Detector
- soc 설계
- Today
- Total
거북이처럼 천천히
FND (Flexible Numeric Display) - 기초 (1) 본문
FND (Flexible Numeric Display) - 기초 (1)
유로 청년 2024. 5. 30. 08:56서론
FND (Flexible Numeric Display) 은 아래의 그림와 같이 여러 개의 LED를 이용하여 10진수 숫자 또는 16진수용 문자를 표시하는 소자이다. 이를 7-segement , Flexible Numeric Dispaly 이라고 한다.

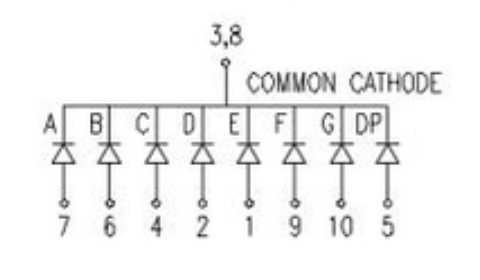
이번 구현에 사용할 FND는 5161AS의 Data sheet를 보게 되면 다음과 같이 구성되어 있으며, 특히 아래 그림과 같이 Common cathode 로 구성되어 있다. 이는 3, 8핀의 GND을 모든 다이오드들이 공유하기 때문에 각각 다이오드가 연결된 핀에 전압을 인가하게 되면 전위차에 의해 전류는 다이오드를 통해 GND로 흐르게 되며, 이를 통해 다이오드에 불이 들어오게 된다.

본론
이번에는 다음과 같은 구현을 함으로서 FND 의 개념과 기초 활용에 대해서 알아 보겠다.
- PORT A에 FND를 연결한 뒤, 0 ~ 9 숫자 출력
- PORT D (PD0) 에 버튼을 추가로 연결하여 Rising edge sensitive 에 Interrupt를 발생시켜
숫자를 카운트하는 방향을 전환시키도록 설계
FND (Flexible Numeric Dispaly)을 이용하여 0 ~ 9 까지 숫자 출력
- 환경 : PORT A의 8핀에 FND을 모두 연결 하였으며, FND의 3번 핀에 GND로 연결시켜 출력에
필요한 7핀이 3번 핀을 통해 공통된 GND를 갖도록 설계
- Source Code
#define	F_CPU 16000000UL
#include <avr/io.h>
#include <util/delay.h>

// Substitute constant
#define LED_DDR			DDRA
#define LED_PORT		PORTA
#define BUTTON_DDR		DDRD
#define BUTTON_PIN		PIND
#define TIME			500

// Function prototype.
void init_LED();

// Main method
int main(void) {
	init_LED();

	uint8_t numbers[] = {0x3F, 0x06, 0x5B, 0x4F, 0x66, 0x6D, 0x7D, 0x27, 0x7F, 0x67};

	while(1) {
		for(uint8_t i=0; i<sizeof(numbers)/sizeof(uint8_t); i++) {
			LED_PORT = numbers[i];
			_delay_ms(TIME);
		}
	}

	return 0;
}

// Initialization about LED
void init_LED() {
	LED_DDR = 0xff;
}
- 5161AS는 common cathode 형식으로 연결되어 있기 때문에 anode (산화 전극)에 5V를 인가해주게 되면 Ccathode (환원 전극)에 GND와 연결된 상태이기 때문에 전위차에 의해서 anode 에서 cathode로 전류가 흐르게 된다.
- 구현 영상
버튼을 연결하여 Rising-edge sensitive 에 Interrupt를 발생시키도록 만든 뒤, 버튼을 누를 때마다
FND의 카운트 방향을 조절하여 출력
- 환경 : 첫 번째 구현 회로에서 추가적으로 PD0에 Switch 연결 시킨 뒤, Rising-edge에서 Interrupt를 발생시키도록 설계
- Source code
#define	F_CPU 16000000UL
#include <avr/io.h>
#include <util/delay.h>
#include <avr/interrupt.h>

// Substitute constant
#define LED_DDR			DDRA
#define LED_PORT		PORTA
#define BUTTON_DDR		DDRD
#define BUTTON_PIN		PIND
#define TIME			500

// Global variable
// Forward = 0, Backward = 1
static uint8_t direction = 0;

// Interrupt Service Routine
ISR(INT0_vect) {
	direction = (direction)? 0 : 1;
}

// Function prototype.
void init_LED();
void init_BUTTON();
void control_LED();

// Main method
int main(void) {
	init_LED();
	init_BUTTON();

	uint8_t numbers[] = {0x3F, 0x06, 0x5B, 0x4F, 0x66, 0x6D, 0x7D, 0x27, 0x7F, 0x67};

	int index = 0;

	while(1) {
		if(!direction) {
			index++;

			if(index>=10) index %= 10;
		}else {
			index--;

			if(index<0) index += 10;
		}

		LED_PORT = numbers[index];
		_delay_ms(TIME);
	}

	return 0;
}

// Initialization about Button
void init_BUTTON() {
	// PD0에 연결
	BUTTON_DDR &= ~(1<<DDRD0);

	sei();

	// Rising edge sensitive
	EICRA = 0x03;
	EIMSK = 0x01;
}

// Initialization about LED
void init_LED() {
	LED_DDR = 0xff;
}
- Interrupt를 감지하면 ISR (Interrupt Service Routine) 영역에서 Direction 변수를 변경하여 FND의 숫자 카운트 방향을 조절하게 된다.
- 구현 영상
'Embedded Programming (AVR) > Atmega 128A (실습)' 카테고리의 다른 글
| Timer / Counter - 기초 (1) (0) | 2024.06.01 |
|---|---|
| FND (Flexible Numeric Display) - 기초 (2) (0) | 2024.05.31 |
| Interrupt - 기초 (1) (0) | 2024.05.29 |
| GPIO - LED control (3) (0) | 2024.05.29 |
| Atmega 128A의 버튼 (기초) (0) | 2024.05.26 |


